Pine Needles at Gardner Village
1100 W 7800 S #3
West Jordan UT 84088
801-233-0551

contactus@pineneedlesonline.com

Showing posts with label Tutorial. Show all posts

Tuesday, April 9, 2013

Pine Needles on Studio 5

Welcome KSL's Studio 5 viewers!  On today's show Holly showed a couple of fun and easy projects to decorate your home.  With Easter so early this year, our homes are lacking decorations that usually last us through April.  But we can help with that, so without further fuss lets get to our tutorials.  Up first a springtime mini bunting...


SUPPLIES:
  • a variety of spring fabric scraps
  • 1 fat eighth of white wool/felt
  • 1 yard 3/4" pink ric rac
  • 2 - 7/8" yellow buttons
Note: We have used the Big Shot die cut machine and Sizzix Heart Layers die which is available at Pine Needles. If you do not have access to this we have pre-cut wool/felt shapes available for purchase. A template is also included at the end of this tutorial. 

Step 1. Using the Big Shot and your Heart Layers die cut out 7 wool/felt scalloped hearts. Using your rotary cutter remove the top of each heart just below the cleavage. Yes, I said it, cleavage :)


Step 2. Again using your big shot and die cut out 7 print hearts from a variety of spring fabrics. Using your rotary cutter again remove off the top of each heart.


Step 3. Sew print each print fabric to wool/felt piece.


Step 4. Beginning approximately 6" from end of ric rac, lay the ric rac on top of the first bunting piece and sew through the center of the ric rac.  Line up the next bunting piece so that the corner touches that of the previous bunting, and sew ric rac to the top of the 2nd bunting piece.  Continue until all of your bunting pieces are sewn in place.

Wah-lah! You are finished with our first project!


Now for our second project, a yo-yo topiary
 
SUPPLIES:
30mm Clover Yo Yo maker
40-45 green fabric scraps
thread for making yo yo's
Fabri-Tac permanent adhesive
Styrofoam ball (mine measured 4" across or 12" around)
approx 35 pink buttons
metal or clay pot


STEP 1:

Using green fabric scraps make 40 - 45 yo yo's
(this is a GREAT mindless project to do while watching your favorite movie or TV show!)


 STEP 2:
Using Fabri-Tac glue yo yo's around the mid line of the Styrofoam ball.
Continue gluing yo yo's above this row until the entire top of the ball is covered with yo yo's.
STEP 3:
Glue assorted buttons in center of some of most of the yo yo's
STEP 4:
Place a thick line of Fabri-Tac on Styrofoam ball below line of yo yo's and place in pot.Tie ribbon around pot. Put a pin through center of bow going into the Styrofoam ball to hold ribbon in place. ENJOY!

Thank you for visiting our blog, we hope you enjoy both of our tutorials!

Wednesday, January 16, 2013

It's Time for a Tutorial!

I am so ready for some sunshine, how about you?  I love this time of year when we are deep into winter and I get to bring a little sunshine in my house with my Valentine decorations.  I have wanted to make a headband using our fun metal blanks and thought this was the perfect time for it.  Wouldn't your little cutie-pie look adorable wearing this!

Sweet Valentine Headband


 So let's get started....... gather your supplies. You will need
  •  one headband blank (available at the store)
  •  1 or two scraps of green wool and/or wool felt
  • 3 buttons
  • 3 scraps of fabric for the flowers (approximately 4" each)
  • 1 - 2-1/2" x 13" fabric to cover headband
  • glue gun
  • basic sewing supplies
  • 1/2 yard ribbon
Now let's put it together. (I hope you don't mind, but I like pictures and so this tutorial is full of them, bear with me)


  • From two of your flower fabrics cut a 2-1/2" circle, from the remaining fabric cut one 3-1/2" circle.
  • Mark the center of each circle with a pencil. 
  • To create flowers fold one edge of circle up to meet your marked center.

  • Rotate and fold up the edge of the circle so that point A (see illustration) meets up with marked center. Continue rotating and folding, each time having the outer right fold point meet up with the center mark. 
  • Tack at center point to keep folds from opening up.
  • Sew a button in the center. Note: The folds are the "right" side of the flower.  Repeat for all circles.
  • Cut out two leaves from wool or wool/felt approximately 2" long and 1-1/4" at the widest part.
  • Tie a double bow with ribbon. 


  • Fold headband cover fabric lengthwise right sides together. Sew a scant 1/4" seam along the long edge. 
  • Sew a 1/4" seam along one end, with the seam down the center. Turn right side out.
  • Slip over the metal headband with the seam on the inside.
  • tuck raw edge in at the end. Hand stitch or hot glue -opening closed.


  • Glue leaves in place beginning approximately 3-1/2" from end. 
  • Glue largest flower in place.
  • Glue two additional smaller flowers next overlapping.
  • Finish by gluing double bow under the edge of the small flowers.
I hope you enjoy!

SANDY


Tuesday, September 11, 2012

Make it Monday!

Last year,at this time, my sisters, sisters-in-law, our mom & I all went to the Workman cabin in Midway and had a weekend retreat of sewing, card-making, movie watching and of course eating yummy food!  There were a couple of projects I brought along for us all to make while we were away.  One of them was a darling appliqued pillow from the Art to Heart book Bittersweet.  And the other was an embroidered/appliqued Halloween project I had designed.  I found the completed project in my 'fall bin' a couple of weeks ago and I still adore it.  So I decided to share it with you today. 


This project can be made in as little as an hour, with whatever Halloween fabric scraps you have on hand.  Or as you can see from the photos of mine, I used some basic orange and basic black scraps of fabric for the bunting pieces.  You will also need a 8" wooden embroidery hoop (I painted my wooden embroidery hoop black), a small piece of osnaburg, a scrap of solid gray fabric, a 2" strip of Heat 'n Bond LITE, and a little bit of black embroidery floss.  Not only is this project a quick one, but it is inexpensive too!  Click here to download the PDF pattern and get started right away on this 'spooky' little project  :)

  • Start by tracing the bunting shapes onto the paper side of the Heat 'n Bond LITE.  Iron to the wrong side of your fabrics scraps and cut out on lines.  Using the pattern as a guide to lay out your bunting pieces, remove the paper and iron in place. 
  • Next, trace the tree shape onto the osnaburg and stitch with one strand of black embroidery floss.  
  • Cut a piece of solid gray fabric large enough to fit into down into the hoop.  Using the pattern as a guide, lay the gray fabric across the bottom of the stitchery, and sew 1/8" in from the top edge using your sewing machine. This will hold the fabric in place.
  • Trace the word 'spooky' onto the gray fabric and stitch using 2 strands of black embroidery floss.
  • The final step is to place the stitchery into the hoop, trim the excess fabric away from the back, and you are done!  (for a great tutorial on framing in an embroidery hoop, click here)

Monday, August 20, 2012

Make it Monday


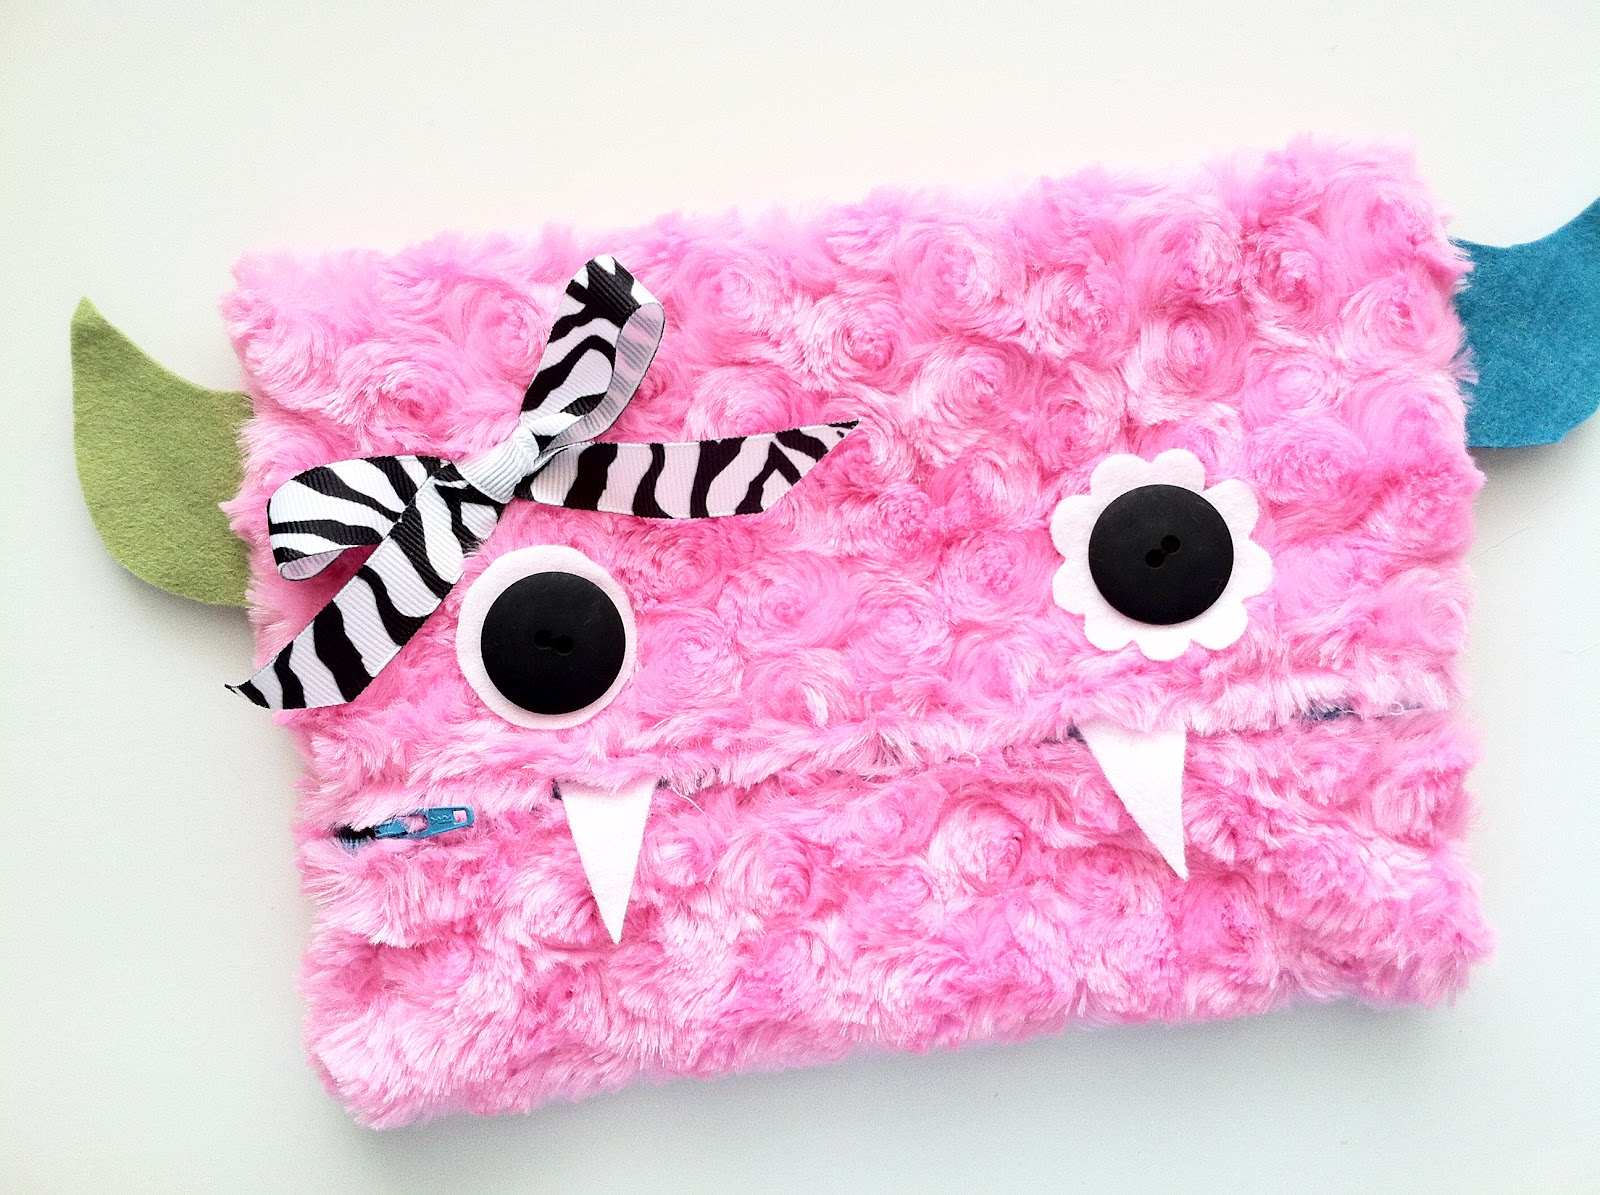
It's back to school time! Here's an idea for something extra special to send off with your little monster on their first day. Having something this cute and handmade will remind them at school how much they are loved. Super soft minky makes the perfect monster fur, and the shop is full of so much adorable minky right now! I brought my 3rd grader with me into the shop to pick out her favorite color. I think this fuzzy pink she picked is perfect!

For your supplies you'll need a third of a yard of minky fabric, a fat quarter for the lining, a colored zipper for the mouth (the shop also has lots of fun bright colored zippers to choose from!) 2 button eyes and some scraps of felt.


Before I began, I used the scraps of felt to make some eyes, teeth and horns for my monster. I drew these little pieces free-hand.


Next, trim your fabric to 10 x 14 inches. You'll need one 10 x 14 inch piece from the minky and one 10 x 14 inch piece from the lining fabric.


Iron the 10 inch sides of both fabrics in 1/2 inch, like you see I've done below. Minky can be a little tricky to work with and iron. I placed a separate piece of cotton on top of the minky while I ironed it to keep it from melting. It also doesn't like to hold a crease, so a bit of starch might help.


To sew on your zipper I used a very simple method. I didn't want to have to cut my minky any more than I needed to (the stuff can get pretty messy!) so I kept it to just one piece. In order to sew your zipper in this way you'll have to top stitch it in place. Lay your two pieces of fabric WRONG sides together and slip your zipper in between the two fabrics (on the 10inch side, where you just ironed your 1/2 inch seam). Make sure that the pull of your zipper is facing the minky side, or the outside. Pin your zipper in place. See picture below for help.


Next top stitch your zipper in between your two fabrics, like I've done below...


You'll now bring the other side around (so it forms a tube) and do the same thing, pinning it to the other side of the zipper. It helps if you unzip the zipper!


At this point I added my little monster's features.


Position your zipper so it is about in the middle of the face, I did mine a little lower, where a mouth would be.


Get creative with the features. You could have one big eye and one little or maybe even 3 eyes!

Turn your monster inside out and unzip your zipper about half way...


Sew the sides closed...
(as your are sewing up the sides you can add some horns if you like. Just slip them into the seam and sew straight across)


You can sew straight across your zipper. Just make sure that the end of the zipper that is open meets up together. Trim off the excess zipper.


Now turn your little monster right side out through the open zipper.


Don't forget, once she's done she'll be hungry for some brand new school supplies!


Here's to a great new school year! You can check out a picture of my daughter with her brand new Minky Monster Pencil Case on my blog at mycottoncreations.blogspot.com


Sunday, August 5, 2012

MAKE IT MONDAY - Yo Yo Bracelet tutorial

I am excited to be back with you for Make It Monday!  It's been a while since I have shared a tutorial with you, but this one is a goodie!  My sister Sherie made the most fabulous bracelets for all of us last Christmas and I am excited to share how she did it with you!  

Here is a quick video of the finished product.


Supply List:
  • 1 metal cuff
  • Fabric scraps
  • 20mm Clover yo yo maker
  • 30mm Clover yo yo maker
  • Needle & thread
  • Fabric Tack glue or hot glue gun
  • decorate buttons and/or beads


  1. Measure width of metal cuff and add 1/2" (image 1)
  2. Measure length of metal cuff and add 1/2" (image 2)
  3. Cut fabric for covering metal cuff to equal this measurement. (image 3)
  4. Fold in half, right sides together and sew along long edge using a scant 1/4" seam allowance. Open so that the seam is down the center and sew one end closed. (image 4).  
  5. Turn right side out and thread onto metal cuff (image 5)
  6. Fold open end of fabric in around metal cuff and hand stitch closed (image 6 & 7)
  7. Using your 20mm and 30mm Clover yo yo makers create an assortment of yo yo's.  I used (5) 30mm and (2) 20mm yo yo's. Glue along bracelet working from the center and out either side. 
  8. Embellish.  I added 2 buttons and then glued a pearl bead in the center of one of my yo yo's. 
Of course, the metal cuff that I used is available at Pine Needles as well as the Yo Yo makers.  If you haven't used these fabulous goodies you must give it a try - what a snap!

Here's a link to Pat Sloan's video on how to use them.

Monday, June 18, 2012

Make It Monday


For this week's Make It Monday I decided I wanted to do something super simple and perfect for summer. With the gorgeous weather outside, we've been spending more time on the go and I need something cute but FAST to do with my hair each morning. This headband is great when you need to tie your hair back quickly but still want to look cute and put together.

The only supplies you'll need are a quarter yard of fabric and some matching thread. I chose this bright polka dot that is in stock at the shop right now. There were lots of colors to choose from, it was tough to make a decision!

You'll cut your fabric into two 3 1/2 inch strips...


And you'll sew those two pieces together like I demonstrate below...

One- Lay the two pieces of fabric right sides together with the corners making a 90 degree angle.
Two- Sew diagonally across the two pieces.
Three- Trim off your excess.

Once you have your two pieces sewn together, you'll probably want to trim it down a bit. I trimmed mine down to 63 inches and that seemed to fit my head well. You can wrap your piece around your head and decide how long you'd like it to be.

Open up your two pieces and your seam should look like this. Press your seam.


Turn your headband around and iron the edges in towards the center 1/2 inch...
(like you see below)


To add a nice finished end to your headband, fold the end into a point like you see I've done below...


Then fold the whole thing in half and press your headband well.


Top stitch all along the open edge of your headband using a matching thread.


And you're done!


You can wrap your headband lots of different ways but my favorite way is to twist it on the top and tie it underneath...


Hope you all are having a FUN summer!


For more origional tutorials visit me on my blog at