Pine Needles at Gardner Village
1100 W 7800 S #3
West Jordan UT 84088
801-233-0551

contactus@pineneedlesonline.com

Wednesday, March 28, 2012

What's New Wednesday.....

by Pine Bough Designs
 by Pine Bough Designs
 
The last few weeks we have shown you new fabric lines that have come into the shop, so this week we thought we would show you some of the other new products in the shop.  Here are a FEW of the new quilts hanging in the store, as well as a FEW of the new embroidery patterns that are available. 

Urban Table Design by Julie Popa Designs
made out of a variety of fabrics
by Pine Bough Designs
Sugar Dish by Cluck Cluck Sew
made out of Fly a Kite by Riley Blake Designs


Skipping Squares by Cluck Cluck Sew
made out of Get Together by Free Spirit Fabrics


Monday, March 26, 2012

MAKE IT MONDAY - Karie joins the team!

I am soooo excited to introduce you to Holly and My Sister Karie who is joining us for her first Make It Monday post.   I guess you would call Karie the middle sister, there are three sisters older and two younger.  She's the one pictured here on the far left. I am hoping to rope more of my other talented sis's and my Mom into sharing their talents with you - they are all amazing women!
 
Karie, Holly, Natalie, Mom, Kathy, Sherie and Sandy
 

Here is an easy "thank you" idea when you want a little more than just a card. First create a card using cardstock (size 5.5" x 4.25"). I covered mine with instructions from an old pattern. Use anything you have on hand to for the sentiment - stickers, stamps, computer.  Create a little tab and glue to the card front to hold the clip in place. Then grab some wool felt in your favorite colors and cut out a flower shape and leaves. I used fabri-tac to glue my layers together. You can add embroidery, beads, buttons or anything you want to fancy it up.


For the back, I hot glued one side of the clip to the flower and glued a piece of felt over that to help hold it together. Now you have a cute clip that can be used on a purse or shirt, or as a barrette.


 I can't sew a beautiful quilt like my sisters, and if I could, I sure wouldn't give it away! But who says you have to create an entire quilt from a quilt pattern?  Simply pick a portion of a pattern that you love and size it to fit in a frame or on a pillow. I used the Pine Mountain Wonky Love pattern to create this cute piece. Notice the initials "carved" in the branch? I really have to like someone to give them something I spent a lot of time and effort on, but I think this would make a darling wedding gift I wouldn't feel bad about giving away!  


Saturday, March 24, 2012

AND THE CHEVRON FABRIC PACK WINNERS ARE....

 Jennie from Salt Lake is the winner from our list of  Blog Followers 


and Paula from Apple Valley CA is the winner from the list of our Facebook Followers

Congratulations ladies!!!!  Email me at pinemtndsg@aol.com your name and address with WINNER in the subject line and this fabulous fabric will be on it's way to you!

Wednesday, March 21, 2012

What's New Wednesday


I'm back again with some fabulous finds for What's New Wednesday!

This past week has been crazy with fun new stuff!!!

In from Riley Blake are 3 new fabric lines.....

We are all going crazy for the fabulous group of Chevron prints - 10 fabulous colors and we have them all....while they last, they are going FAST!


 Chevron Prints by the Riley Blake designers

Saddle Up by Samantha Walker for Riley Blake 
Peak Hour by Kellie Wulfsohn of Don't Look Now for Riley Blake

The latest edition of American Patchwork & Quilting magazine "Sew Much Better" is in stock with some great tips.  I really enjoyed the article "Machine Quilting Made Easier". Tips plus tons of photos, great resource.

slideshow image
Sticks & Bricks is my favorite quilt pattern feature in the magazine.  Can you just see all your fabulous Amy Butler fabrics in a quilt like this - oh yah.

Spring is everywhere in the shop - Check out Nancy's blog for photos of her recent trip to the store.

Iza Pearl Design - Cabana Blooms - Damask in Gray
Also in is a fresh new line from Windham Fabrics Cabana Blooms! This is going to be an amazing line for making bags, skirts, endless possibilities.

That's a taste of what's new in the store, but that's not all.  Here is a little Wednesday Special for you.


Save 25% off Mod Tod fabric by Sheri McCulley for Riley Blake
click here to see all the fabulous prints!

Tuesday, March 20, 2012

FREE Merry Day pattern!


Here's a little gift for you from me!  This little postcard cushion measures 10.5" x 13" and is created in a soft spring pallet and is full of charm. We have a limited number of kits available that include all the beautiful fabrics used, you add the ribbons and embroidery.


Stop in the store today and pick up your FREE pattern!

For out of town friends, email me at pinemtndsg@aol your name, state, and email address with POSTCARD in the subject line and I will email this to you.

Monday, March 19, 2012

MAKE IT MONDAY - Scissor Case


Welcome back to Make It Monday!  Today we are excited to bring you a guest tutorial created for us by Nancy from My Cotton Creations


My Cotton Creations
CLICK HERE TO VISIT NANCY FOR THIS FUN TUTORIAL
The best part is how this fun scissor case is made......by folding your fabric to create the pockets!  Super quick and easy.

Monday, March 12, 2012

MAKE IT MONDAY - Point of Candy Bars

We're back again for 
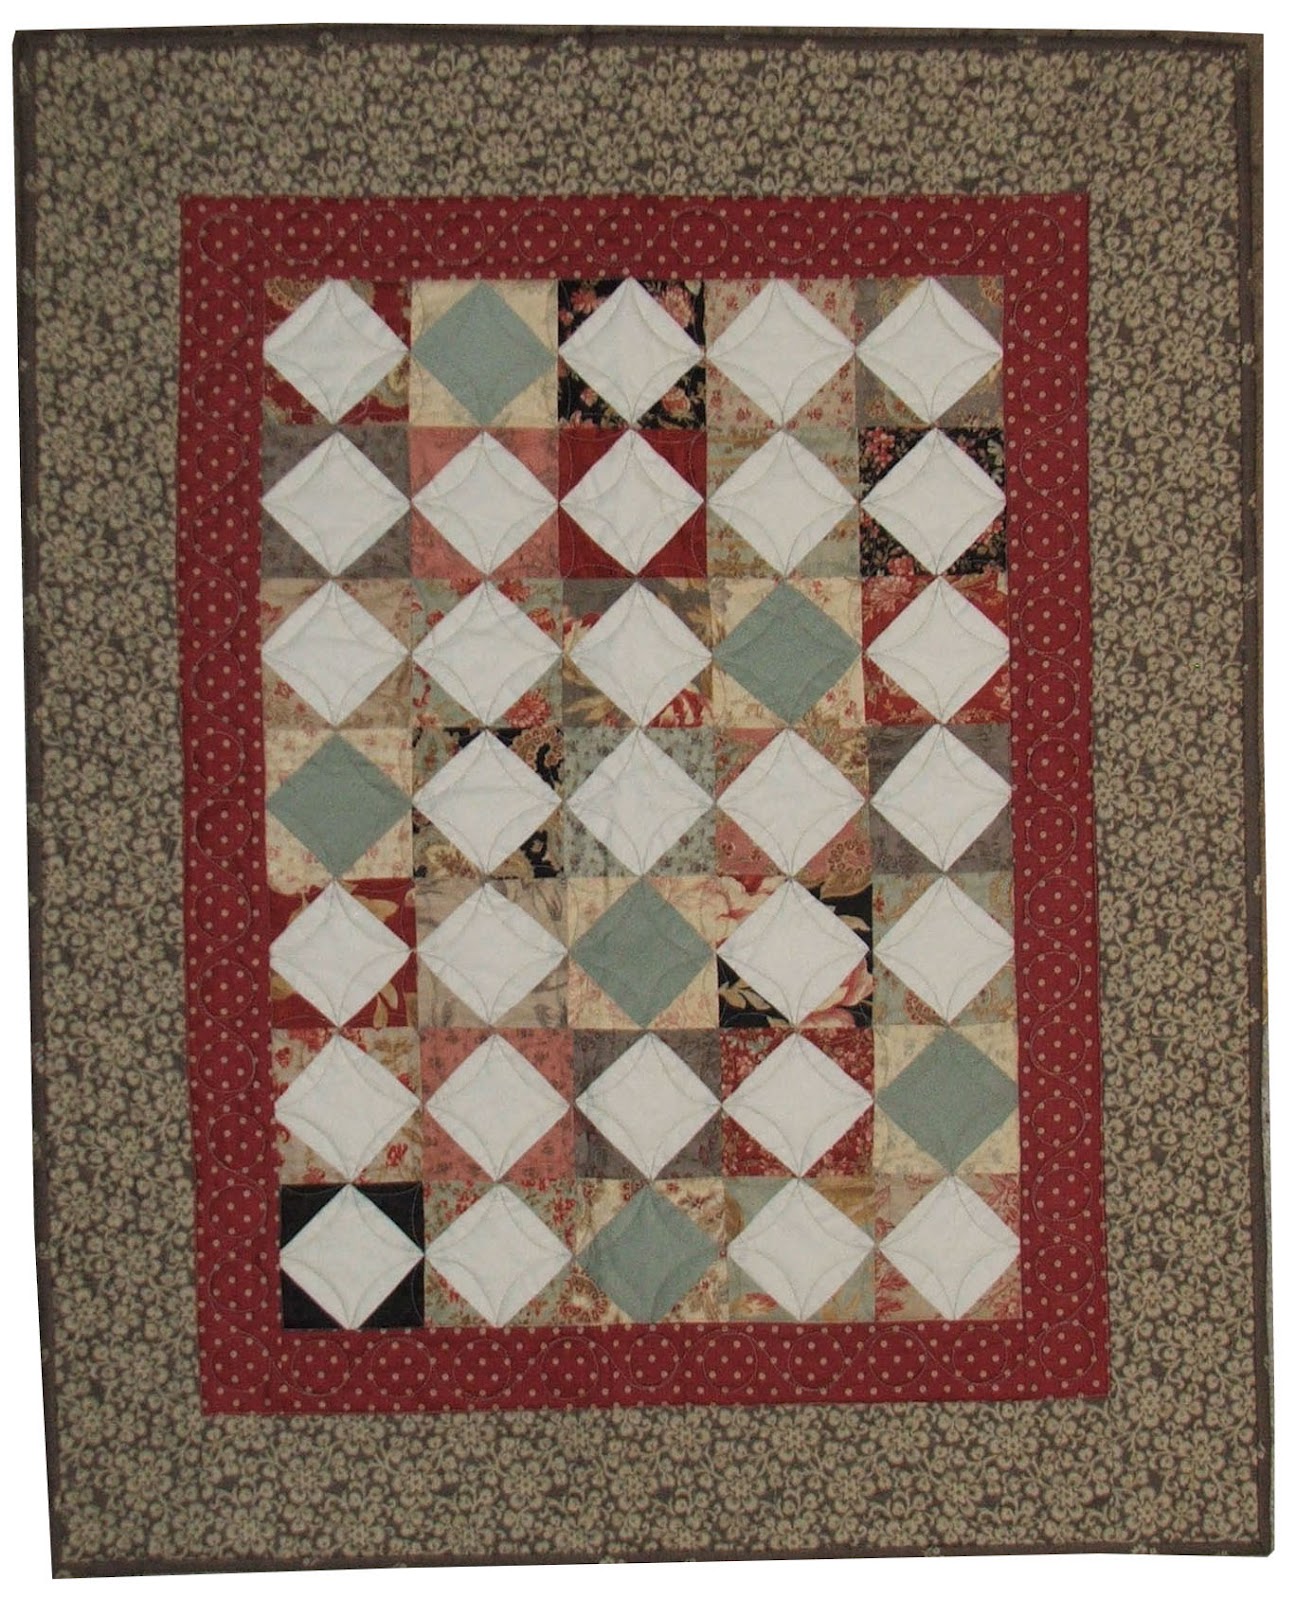
Make it Monday and this week we bring you a Candy Bar quilt (finished size 28 1/2" x 36").  What's a candy bar you might ask?  It is a stack of 2 1/2" x 5" pieces from Moda.  So, without further adieu let's get going.....
SUPPLY LIST:

1 candy bar (35—2 1/2” x 5”rectangles)
1/8 yard slate blue
1/4 yard cream solid
1/3 yard red stop border
1/2 yard outer border

CUTTING:
Candy bars:
Cut each candy bar rectangle in half resulting in 35 pairs of 2 1/2” x 2 1/2” squares.


Cross-cut the squares on the diagonal into (2) triangles. Keep them paired up, as you will need four matching triangles per block

Cream fabric:
Cut three 3” x width of fabric strips.
Cross-cut the strips into 3” x 3” squares; for a total of 29 squares.
Contrasting fabric (slate blue):
Cut six 3” x 3” squares
Stop border (red):
Cut three 2.5” x width of fabric strips
Outer border:
Cut four 3.75” x width of fabric strips

SEWING: 1/4” seam allowance for all sewing. Press as you go.

Sew a triangle to opposite sides of cream square. Press.
 Sew the other two matching triangles to opposite sides and press (the cream square is now on point). Repeat with remaining 28 cream squares and 6 contrasting squares

Sew five squares together to make one row. Repeat for a total of 7 rows. Sew the rows together.

Measure through the vertical center of quilt and cut two strips of the stop border print to this measurement. Sew to sides of the quilt.

Measure through the horizontal center of quilt and cut two strips of the stop border print to this measurement. Sew to top and bottom of quilt.

Again, measure through the vertical center of the quilt and cut two outer border strips to this measurement. Sew to the sides of the quilt.

Measure through the horizontal center of the quilt and cut two outer border strips to this measurement. Sew to the top and bottom of the quilt. 

Quilt and bind as desired.


MENTION THIS TUTORIAL AND SAVE 25% OFF ANY CANDY BAR
offer expires 3/17/2012


Thursday, March 8, 2012

Bless You....


Well, today it actually looks like spring has sprung!  I cannot wait for the weekend - 60 degrees, YES!
Well, you know what comes with spring sunshine.......  spring allergies.  Here is a simple and fun tutorial from Cindy at Riley Blake.  My mind is turning for all the ladies this would be a fun inexpensive 'thinking of you' gift. 
Enjoy!

Wednesday, March 7, 2012

What's New Wednesday

Hi All,

Today on What's New Wednesday we bring you our newest cross-stitch kits now available in the store!
Have you seen the new series of Medium pillow kits Sandy has designed.  This is a fun group of monthly pillows. April's design is in the store in plenty of time for you to stitch it up before that Hoppy time of the year!
Sandy's kits are such a great grab-and-go project because everything you need is there, Pre-sewn pillow, DMC floss, tapestry needle....it's all included.  Here's a peak at the prior months designs. Sooo easy to stitch and finish.

In addition to this fun line of monthly designs Sandy has a new series of 12" flange pillows.  April's design shows a darling bird on the branch and butterflies in flight each Welcoming Spring.   And once again this kit includes everything you need, pre-sewn pillow sham, DMC floss, tapestry needle - it's all there!
Here's the other cute kits from January - March

Thanks for joining us for What's New Wednesday!

Monday, March 5, 2012

March Bunting - MAKE IT MONDAY

Hi ladies!  We are so excited to be starting a new series for you called
MAKE IT MONDAY!
Each Monday will bring you a fun new tutorial from our design team.  To kick this off  we are starting a series of little buntings that we hope you will enjoy!

MARCH BUNTING

Supplies:
  • A variety of green scraps
  • 1 fat quarter of white wool/felt
  • green wool/felt scraps for sharmock
  • 1 yard 3/4" green ric rack
  • 1 yard 3/8" ribbon
Note:  We have used the Big Shot die cut machine and Sizzix Heart Layers die which is available at Pine Needles. If you do not have access to this we have pre-cut wool/felt shapes available for purchase. A templated is also  included at the end of this tutorial. 

.
Step 1.  Using the Big Shot and your Heart Layers die cut out 6 wool/felt scalloped hearts.   Using your rotary cutter remove the top of each heart just below the cleavage. Yes, I said it, cleavage :)


 Step 2. Again using your big shot and die cut out 6 print hearts from a variety of greens.  Using your rotary cutter again remove off the top of each heart.


Step 3. Sew print each print fabric to wool/felt piece.


Step 4. Beginning approximately 8" from end of 3/8" ribbon, sew ribbon on top of each bunting point.


Step 5. Beginning at the end of the ribbon, sew ric rack to the back side of the ribbon and continuing all along the bunting. The ric rack will extend above and below the ribbon creating little green scallops. 

Step 6. Cut (4) 3/4" x 1" rectangles from green wool/felt.  Cut a small not in the center at one end of each rectangle. Round outside and notch corners.   Make a running stitch joining the row of wool/felt petals. Gather and tie a knot. Glue or sew in place at each end of bunting. 

Wah-lah! You are finished!

Join us for another fun tutorial on next weeks MAKE IT MONDAY!