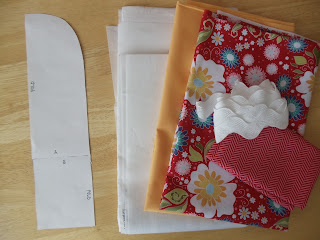
Today I'm bringing you a fun tutorial for a sewing machine cover. It's not only cute but functional. I especially love the big pockets on the side for storing sewing supplies. First up you're going to need to gather your supplies. You can find this cute fabric, called Apple Of My Eye, right now at Pine Needles. For this project you will need...
3/4 yard outside fabric (flowers)
3/4 yard lining fabric (yellow)
3/4 fusible interfacing (I used Pellon Decor Bond)
2 yards jumbo rick rack
fat quarter (pockets)
template (found at the end of the tutorial)
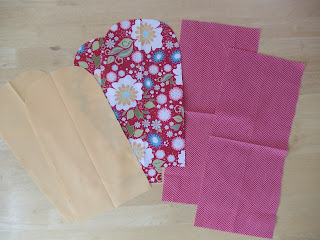
Print off the template found at the end of this tutorial and use that to cut out the sides of the cover. Fold your fabric in half and line up the edge that is marked FOLD with the fold of your fabric. You'll need to cut 2 from your outside and 2 from your lining fabric.
Using your fat quarter, cut 2 pocket pieces 15 1/2 inches x 7 inches.
For the main body of your cover cut a piece that is 30 inches x 20 inches. Apply interfacing according to the manufacturer's instructions to all of the outside fabric pieces (2 sides and main body piece).
Fold your pocket pieces in half and top stitch 1/4 inch from the fold.
Place your pockets on top of your side pieces as shown below...
At this point I stitched my rick rack on with a scant 1/4 seam so that I could remove the pins in preparation for pinning the side pieces to the main outside piece.
You can see below how I pinned the side pieces to the main piece of the cover...
Sew your sides into place.
Once you have both sides sewn onto your main piece, you can turn your cover right side out...
To make the lining you'll follow the same method as the outside. Pin and sew the two side pieces to the main lining piece. Leave a small hole in the side of the lining while sewing the side pieces on (about 3 inches) to turn your cover right side out. Leave your lining WRONG side out and slip your lining over your main piece, like you see below...
Sew the lining and outside pieces all the way around the bottom of your cover...
Pull your outside piece out through the small hole you left in the lining...
Once you have your outside piece pulled all the way through, your piece should look like this...
Sew up that small hole by hand and tuck the lining inside the outside of your cover.
Lastly, you'll want to do a bit of top stitching to ensure your lining stays in place. Top stitch all the way around the bottom and around the curves on the top of the cover.
Place on top of your sewing machine and you're all finished!
I hope this tutorial adds some freshness to your sewing space. And don't forget to come visit me at mycottoncreations.blogspot.com, I'd love to hear how your sewing machine cover turned out!
You can download a copy of the template for free HERE!


11 comments:
Thank you Nancy for this fun tutorial!!
This is such a cute tutorial! I have a hard cover for traveling w/ my sewing machine, but this one will be cute for everyday, sitting cute in my sewing studio! TFS!
Absolutely love it! I know you have the fabric and am going to whip over there and get me some today!
I am really thankful to all your squad for sharing specified inspirational substance.
sewing machine reviews
What a fabulous tutorial. I am just setting up a craft room and I need covers for three machines. I shall be using this tutorial. Excellent instructions. Many thanks for posting
What is a "fat quarter"
Thanks
What is a "fat quarter"
A "fat quarter" is a 1/4 yard of fabric but instead of being cut 9 x 42 it is 18 x 21. That way instead of a long skinny quarter yard, you get a "fat" quarter yard. :)
When I printed the template it seems to be really small...am I missing something? So cute! I can't wait to make mine! Thanks!
Thanks for this great tutorial, just what I've been looking for!
This was the playbook of economic neoliberalism, which would come to be a global strategy to redistribute wealth back to elites.top load washing machine repair
Post a Comment